Colorful Adventures

Tags

, , , , , ,

011

Why is thread on fabric so special, so beautiful?  It’s sort of like handwriting, isn’t it?  You can see the author in every stitch.

Happy Wednesday!

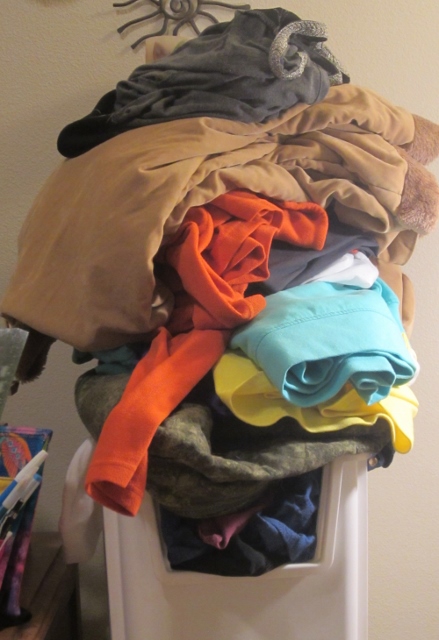
A couple of very colorful finished projects for you today!

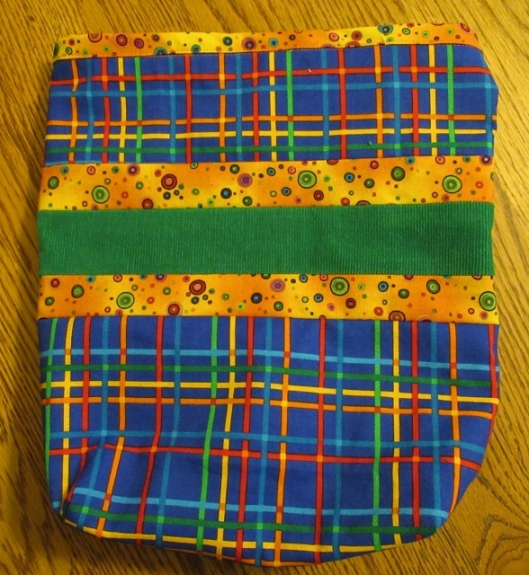
First, the embroidery up above.  Here’s the whole thing:

009 (541x640)

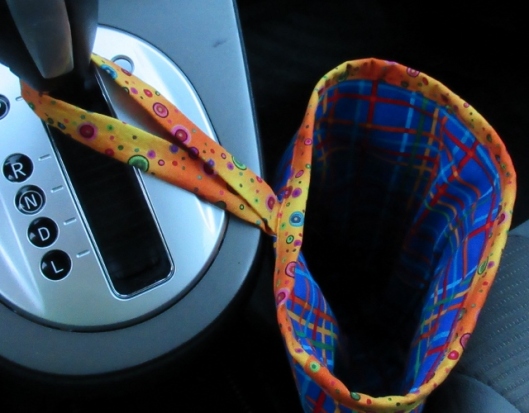
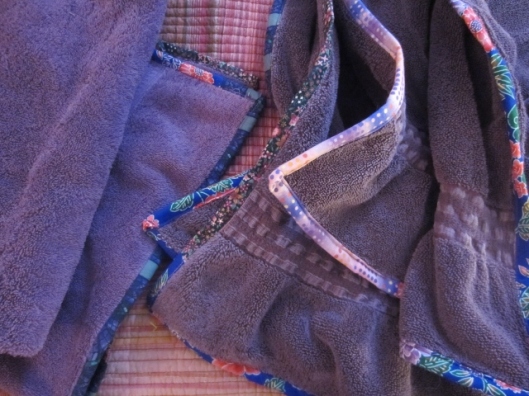
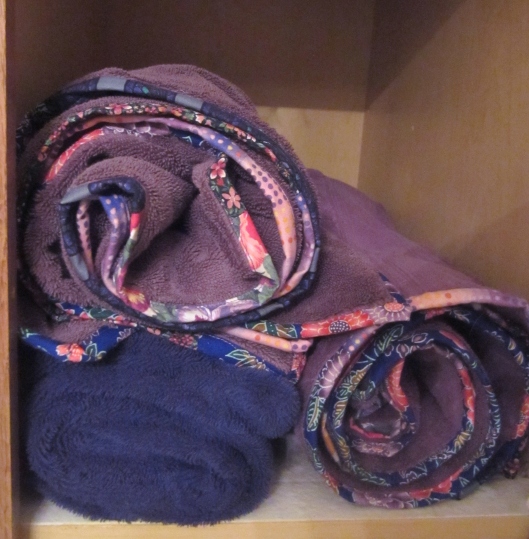
The backing, border, and ties are made of leftover fabric from my Summit Pack.  There’s also a layer of batting in there, just to give it a little body.

I don’t think I’ve posted about this project here before.  The design is from a coloring page (I believe from here), traced onto a scrap of fabric, either a linen blend or a “linen look” fabric.  I started this some time ago with the idea of pitching it to the local makerspace as a potential class, but progress on it has been slow because I always have a million other things that I want and/or need to do while I’m home.  So I started bringing it with me as something to do while I’m waiting for my mother at her physical therapy appointments.

Those appointments have become a highlight of my week.  It’s become such a pleasure to sit and work on this in a quiet room on a sunny afternoon and take a break from all my to-doing and must-get-doneing.  (Why, yes, I am pretty much making up my own words at this point.)  So I was a little sorry to finish this project, but (of course), I have more embroidery projects I’m contemplating.  There’s also an OLD Christmas embroidery kit that I’m thinking about maybe actually finishing (after HOW many years?)

In the meantime, here’s my other finished project–another altered tee, and I am LOVING how it turned out.

Here’s the before, a purchased yellow tee that has been in a drawer for a few years.  I don’t think I’ve every worn it because it’s a little bit small on me.  I’m sure I bought it just because of the color and the gathering at the neck.

009 (626x640)

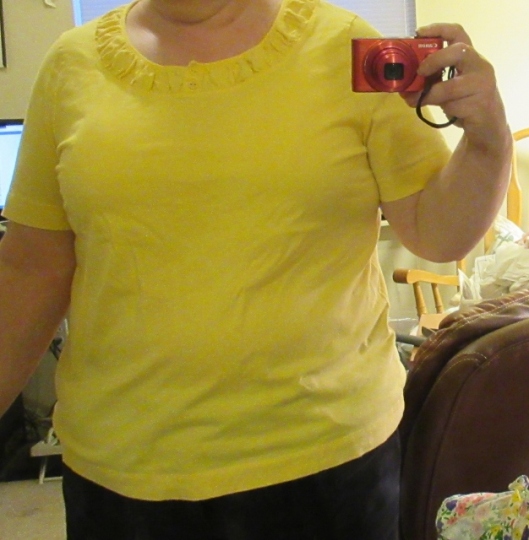
On this one, I wanted to change the sleeves a bit, so I cut off the sleeve hems and removed the entire side/sleeve seams.  I added a bigger wedge this time to the sides–1/2″ wide at the bottom sleeve edge to 5″ wide at the shirt hem.

003 (565x640)

For the cuffs, I pulled out my copy of “Sweatshirts With Style” by Mary Mulari and used her technique.  Basically, you cut a strip of fabric, sew the short ends together, fold wrong sides together, sew onto the sleeve, fold, and press.  I didn’t want to have to re-press the cuff every time this top got washed, so I sewed it down.

005 (640x480)

Recognize the flowered fabric?  I used it to make a dress last summer.

I unpicked the hem for a few inches to either side of the side seams, then resewed it after the wedges were added to the sides of the top.

006 (640x616)

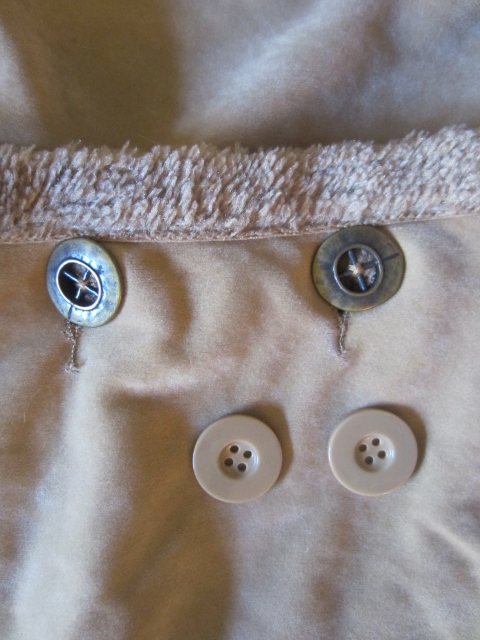
The gathered front originally had two small yellow buttons, but I decided it needed something brighter to balance the sides and sleeve cuffs.  These are two buttons and a bead from the stash.

003

I’m so happy with this top!  Lots of great color, a little bit of swing from the insets, and a fun, comfy top for the summer!

008 (640x612)

Okay, gotta crawl off to bed.  Have a great week and get yourself a lounge in that July sun.

001 (640x460)


STH


Cycling, Upcycling, and Little Risks

Tags

, , , , , , , , , , , , ,

012 (640x480)

It’s a lovely time of year here.  Here’s our old buddy Mr. Moon rising over Columbia Park one recent evening.

Happy Saturday!

I have some random bits and pieces for you today, because, well, it’s been kind of a random couple of weeks.

We had another cycling event near here, this time with an actual sewing connection!  The Cascade 1200, a 1200-kilometer randonnée, began at the Space Needle in Seattle on Saturday, June 23rd.  The cyclists traveled across Washington state in a big loop, finishing up in Snohomish on the following Tuesday.

My part in that–not being the sort of person who rides a bike for 750 miles at a stretch–was to set up a control in the little farming town of Mattawa so that the cyclists could get water and food out there after everything closed down for the night.  My partner had originally intended to do the ride, but later decided against it and came out to help me with the control.

003 (640x400)

Here we are all set up under a street light with a cooler full of drinks in the back of the car, coffee brewing, and me making sandwiches out of frame on the right.

(I have these strange moments of self-awareness when I do this kind of thing.  I suddenly realize that I’m sitting in a parking lot in the middle of nowhere at 1:00 a.m. feeding meals to a bunch of people I don’t know, and I wonder how I ever got into this situation.  Volunteering can be quite surprising, like the hug I got from a South African cyclist because she was so excited that I had hummus to feed her.  And running across a parking lot after your camp stove at 2:00 a.m. because a storm suddenly came up and blew all your stuff off your tables.)

Anyway, the sewing connection is this:  all the volunteers were wearing event tees, and I hadn’t planned to because it fit me like, well, like this.

016

I feel like a lumpy sausage.  😦

It was too long, too tight, and the neck was too high.

But then I noticed all the pictures on Facebook of the volunteers wearing them, and I started to hear a little voice in my head:  psst . . . you know you could alter it . . . c’mon, it won’t take that long . . . .

So the morning of the day we were supposed to go out to Mattawa, I decided to do it.

The only knit fabric I could find in my stash that even kinda sorta went with this slate blue tee was this scrap of cotton jersey:

017 (640x475)

No, it doesn’t go, but at least it’s busy and cheerful.

I cut a few inches off the bottom of the shirt and cut off the side seams from armpit to bottom; the sleeves and bust on this fit fine, so I only had to worry about adding width to the waist and hips.  Using a rotary cutter and mat, I cut two wedges of the jersey, 1/2″ wide at one end and 4″ at the other.  I’ve been hearing for a while now that cutting knits with a rotary cutter is the way to go, and it worked surprisingly well on this fabric.  I was worried that the knit would shift around or not cut cleanly, but no problems at all.

Then I inserted the wedges into the side seams and pressed them.

018.JPG

I cut off the neck ribbing maybe 1/4″ below the stitching and sewed on some binding.  Quick hem and I was done–literally about 15 minutes before we needed to leave for Mattawa.

008 (640x598)

007 (636x640)

It still looks a little lumpy, but I AM lumpy, so that’s gonna happen.

It was a rush job, and most definitely not anywhere near being my best work, but it’s much more comfy now and just feels a lot more like ME.  I really intended to only wear it that one time, and then maybe use it for exercising, but I’ve found myself wearing it a fair bit.  The fabric is so soft, and the shirt is so comfortable now, that it’s just really nice to wear.

More importantly, I’ve been wanting to get into upcycling for a while now, and this alteration is my first tentative step in that direction.  More to come on that–I’ve actually got a second alteration project to show you, but I’ll wait until I can get some decent pictures.

In the meantime, here’s something interesting to consider.  I’m running a sew-along on Facebook again this July-August in the Sew-Along Dinner Date Dresses group.  I agreed to do the sew-along last fall, but it took me the longest time to find a designer dress pattern that I thought might work for larger or apple-shaped women.

Here’s the pattern and the fabric I got for it:

001

This is one weird design!  There are no side seams, just a front and back that extend and have ties; you can tie it in the front or back.  I have no idea if this is actually going to work, much less look good on me, but I think it will be fun to find out!

The fabric is a lightweight “burnout” cotton found in the “specialty cotton” section of the Joann’s in East Wenatchee.  I still need to come up with a contrast fabric for the binding, hopefully from the stash; I’m planning on making a muslin tomorrow, and that will help me get a better sense of whether this is a disaster in the making.  (Plan B, if this indeed does turn out to be a disaster, is to recut those big pieces into something else.)

So if you’re on Facebook and want to try this very weird pattern, join us!  It’s an easy pattern, but there are opportunities for practicing skills like making bias binding and doing narrow hems.  There aren’t many steps in this pattern, so making it over a two-month period will produce a nice, easy pace that won’t interfere with all your other summer fun.

Have a great week, everybody, and take a little risk if the opportunity presents itself.  You can always re-use your fabric for something else.

STH

WIP Wednesday: Finding Some Light

Tags

, , , , , ,

010

Blue Scorcher Bakery in Astoria, Oregon.  I’m kind of wishing I’d brought this little electrical sculpture home with me . . . .

WIP = Work in Progress

So . . . how’s everybody holding up?

If you’ve been following what’s happening in the U.S. lately, it’s felt like a deluge of just ghastly news, day after day after day.  Just one hit after another.

I was going to write about it, but, you know . . . let’s not.  I don’t know about you, but I’m feeling frazzled and overwhelmed.  I’ve been hooked on politics since Watergate, but I really think it’s time to re-balance my life a little.  Between the stress of the news, health worries, family worries, relationship worries, and more, I’m feeling anxious, not sleeping well, and spending a lot more time staring at my fabric than actually sewing it, and that lack of crafty me time is making all the hard stuff even harder.

So let’s look at some nice pictures and relax for a minute, shall we?  Part of coping is just taking a rest from coping once in a while, I think.

I did finally make my car trash bag, though I never did manage to muster much enthusiasm for the project.  Not like me at all, as I tend to fall in love with sewing projects and get obsessive about them.

001 (588x640)

I used this tutorial (again) just for the measurements, and ignored the instructions, as I now have way too many opinions about the proper way to sew bags.  This time I shortened the handle by about half, just to keep it closer to hand when I’m in the car.

The stripes on that blue fabric were not at all printed on grain, so it took a little work (and luck) to make them look all right.  I cut the larger bottom piece so that the horizontal stripes would fall in the seam allowance–fewer visual cues as to the wonkiness–and tried to do the same with the top section, though I didn’t quite make it there, as you can see on the top left.  And I cut the green corduroy with the wales running vertically, to just avoid the whole problem.  I am never going to be one of those ribbon-winning quilters that have perfect grain on everything, but I can fake it well enough to get by.  🙂

Here’s the exciting action shot of it in use.

003 (640x500)

I actually like it much better in the car, as it adds a nice little bit of color to the gray interior.  Oh, and there’s also that having-somewhere-to-put-trash thing, too.

Next up is another knit top, and here is the fabric combination:

004 (640x447)

That fun orange and green print is a cotton/rayon/spandex that I got on sale from Girl Charlee; the white rib knit is from the late, lamented local SCRAP store ($1.50 a yard!)

And here’s the pattern:

IMG_2232edited1__21841.1527022439.200.240

This is Chelsea’s Women’s Crossover Top from CKC Patterns.

I settled on this combination of fabric and pattern maybe a week ago and no movement has happened yet, but AS GAWD IS MAH WITNESS, this puppy is getting cut out tomorrow!  [shaking fist at sky]

Also!

Travel pr0n!

We took a trip to Astoria, OR, the first weekend of June to see off one of our friends who was doing the Trans-America Bike Race.  It’s kind of a strange “race” because it seems that only a few of the riders are actually racing to be first; most of them ride it with the goal of simply finishing (a big enough challenge, certainly).

001 (640x480)

Mount Hood on the way to Astoria.

005 (640x415)

Some of the riders milling around at the start of the race; Maritime Museum in the background.

006

Everybody lined up for photos at the start; our friend is in there somewhere . . . .

So we saw him off, then had some time to wander around Astoria, eat fish and chips, and tour the Maritime Museum before heading home.  It’s a cool little town with some quite grand Victorian architecture from the old days when it was A Very Big Deal and awash with shipping, fishing, and canning riches.

004 (503x640)

Rainbows for Pride.

If I had a job where I could work remotely, I’d snap up one of those lovely Victorian houses in Astoria and fix it up.  Or maybe not . . . I’m not sure wrangling Victorian plumbing is the way to reduce stress in your life.

Anyway, I hope you have a great week and take good care of your wonderful self.  Get your rest; the world will still be there tomorrow.

STH


WIP Wednesday: Climbing Mountains

Tags

, , ,

007 (640x460)

WIP = Work in Progress

Hello and happy Wednesday!

I hope you are well and getting some lovely spring weather and maybe making a few things, too!

I’ve had a pretty productive week here and it came about more or less by accident.

You see, I’ve had fun, bright, comfy knit fabrics on the brain and have been entertaining myself by putting them together in different combinations in my head.  I had so much success with my last couple of knit tops that I’ve been itching to make more things that fit well and feel great.

Then, early last Saturday morning, my honey and I were talking about the long Memorial Day weekend ahead, and he asked me how I planned to spend it.  And my mind immediately went to–not all those lovely, colorful knits–but this ugly mess in the corner of my sewing room:

001 (480x640)

Return of the Mending Pile of Doom (and that’s the Ironing Pile of Doom right below it).

Yes, it’s actually gotten BIGGER since I vowed recently to finally deal with it.

So I decided I was going to finally tame it over the weekend.

Most of it was tedious stuff, so I won’t bore you with it, but one job was an interesting one that I thought I would share:

002 (640x480)

I had two of these purple towels that were still in good shape, but the edges were getting frayed.  So I put a scrappy binding on them.

004 (640x480)

I trimmed the towels a little to remove the frayed edges and the bulky original binding.  Then I sewed on 2 1/2″ strips just like a quilt binding, except that I did the final seam by machine (I do my quilt bindings by hand, just because it turns out a little neater that way).

Here’s how they look in the linen closet.  Cute, huh?  Definitely an upgrade!

008

So, by my count, I mended 9 items, and ironed several more, and here’s the pile now:

006 (360x640)

Not all done, but much better.  I definitely need to get back to my schedule of mending one item after I finish sewing something, so that I don’t let that mess get out of control again.

In the meantime, though, I’m going to take a break to make myself a new car garbage bag with these:

007 (640x460)

I deserve it after all the car drama we’ve had here over the last few months.

I told you a while ago that I was in a hit-and-run accident, right?  Well, it turned out my little Kia was totalled (SOB), and my honey and I decided to go a while before replacing it.  Then, a few weeks ago, what happened?  It was HIS turn to have an accident, and his car had to go into the shop for three weeks.  So we decided to move up the purchase of a second car, and this was the result:

005

New wheels!  Time to make a pretty new garbage bag for my new ride.  And maybe it will make me feel a bit more positive about driving–nothing like TWO accidents in the span of a few months to crank up your driving anxiety.  :/

Anyway, have a great week, make yourself something that makes you smile, and be sure to look before you change lanes.

STH

WIP Wednesday: On the Move

Tags

, , , , , , , ,

007 (640x482)

Oh, bike bag, you’re the only one who understands me . . . .

WIP = Work in Progress

Happy Wednesday!

I have not been doing a ton of sewing this week (more fabric in than out these days–whoops!), but I do have that little bag up top to tell you about.

This was another request from my honey for a little bag to use when he’s out on his bike.  (The type of cycling he does is called randonneuring–long-distance, self-supported, non-competitive cycling.  Basically, cycling long distances (100 kilometers and up) on a set route with controls where you have to stop and get a receipt or signature to prove you were there.  You have to finish within the time allowed, but it’s not a race to see who finishes first.)  He’s set on waterproof bags to carry things like his rain gear and tools while on the bike, but he needed a little bag to carry his phone, brevet card, and wallet when he gets off the bike at controls.  I’d made him one previously, but he decided he wanted a different style and size this time.  He uses these bags a lot, and doing bike rides that last from 6 hours all the way to several days gives you a fair bit of time to think about your gear, so he has some very definite opinions on what features his bags should have.

008 (550x640)

This is about 7″ high by 5″ wide.  All scraps from the stash:  black cotton duck, plain white cotton for the lining, split rings and Velcro from my collection of purse hardware.  The little zip came from a cheap, nasty, plasticky purse that my mother was getting rid of.  Tip from somebody who makes a lot of bags:  even cheap and nasty purses tend to have good-quality zippers!  This is a big, beefy coil zipper, the kind I like because they’re tough without being super bulky.

I had a couple of problems to solve in making this.  First was how to make the zipper coin pocket on the outside front.  The solution I came up with was to cut three of the front pieces out of the black fabric.  One of them was sewn to one side of the zipper, the second was sewn to the other side of the zipper, and then the unit was trimmed to match the third.  The zipper unit was then basted to the third front piece, which now serves as the back of the pocket.

The second issue was what size to cut the front and back so that I could box the corners of the bag.  I found this really nifty guide to the math of boxing corners here (scroll waaaaayyyy down to the end) and it worked perfectly.

So I got this little bag done on Friday afternoon, then we ran off to Wenatchee for my honey’s latest ride.  I didn’t take any pictures in town, as where we were staying in East Wenatchee was basically one big mall punctuated with fast food restaurants, but I did get a couple of good ones on the way home Sunday.

012 (640x480)

Carrying all the electricity generated by the Rock Island Dam.

015 (640x480)

Viewpoint over the Columbia River.

016 (640x480)

A few spring wildflowers among the sagebrush and rock.  Soon to be gone–we’ve had a couple of near-90-degree days here already.

Then it was back home to the floof and his little sister.

002 (640x482)

I am told the bag worked great on Saturday, though I’ve already had a request for more Velcro on it, and he says he has some ideas for the next one.  I have obviously spoiled that boy to just a terrible extent.  😉

Anyway, have a great week, everybody, and I hope you find a little time soon to do the things that make you happy with the people you love.

STH


WIP Wednesday: No Bad Owl Puns, I Promise!

Tags

, , ,

013

Close up of adorable owl print.  This is cotton/Lycra from Minerva Crafts.

(WIP = Work in Progress)

Hello again!

Just a quick one today to update you on the not-so-great owl top from last week, then I’m going to bed because I have not been sleeping well and I’m pretty sure my brain has gone on strike.

Just to recap last week’s exciting action, I made myself a top with the super-cute owl fabric above, didn’t check the sizing very well beforehand and wound up with a top that was a bit more revealing than I would like.

009

I’ve got vents in the sides here and it still looks pretty lumpy.  The sleeves are also uncomfortably tight.

So I ripped out the side seams and added a strip of the bodice fabric all the way from hem to wrist.

014

I love how most of my owls here are looking dubiously at that strip of white.

And here’s the result:

008 (640x543)

006 (608x640)

The fit is much better, and much more comfortable!

The strip of white on the sides isn’t really noticeable, but you can catch a glimpse of it here.  I kind of like the little accent, but I chose white for it so that it wouldn’t become a focal point.

005 (640x615)

The faux piping is looking a little wavy at the chest here, but I’m not too bothered about it.  I still like the accent, and green always makes me happy.

This is now the second Ellie and Mac pattern I’ve made, so a couple of comments on their patterns so far:

—  I really like that you can get this top–in my pretty big size–out of a yard + some scraps of fabric.  I’m sewing with knits more and more, which means knit scraps, which aren’t all that easy to use up.  I love that I can splurge just a little on an adorable knit like this one (which wasn’t cheap), use up some scraps, and have a great top to wear!

—  The patterns are pretty simple and easy, with photos for each step.  Maybe a little too simple sometimes, as the two I used didn’t include a few steps you’ll find in Big 4 patterns like stay-stitching.

—  Both patterns I’ve used from this company (the one here is the Discoverer Tee, and I’ve also made the Memphis Top) have unusually high necklines.  I’ve actually cut both down a bit so that they wouldn’t come up high enough to bother me.  Which is just fine with me, because my usual problem with knit tops is that the neckline is too wide and my bra straps are showing and the top is sliding forward and flashing people.

—  The size range on these patterns is good (XXS to 4XL) and they show women of all sizes in their product photography.  If you aren’t an older fat woman like me, you may not realize how amazing this is!  Big 4 patterns have had a good size range as far back as I can remember, but it was only recently that women my size and larger were actually shown on pattern envelopes and in pattern books, instead of being hidden away like a shameful secret.

—  Unlike other indie pattern companies that I’m familiar with, Ellie and Mac believes in promotion.  Yeah, I know we all get too much junk email, but if you like their patterns, it really does pay to sign up for their emails.  It won’t be too long before something you like is on sale, sometimes for as little as $1.

Anyway, I gotta sleep.  I hope your Wednesday was great and that Thursday is better.  I’ll yak at you again soon.

STh


WIP Wednesday: Standards

Tags

, , ,

006 (447x640)

WIP = Work in Progress

Happy (late) Wednesday!

I did some more sewing this past week, and also a bit of thinking, but first the sewing.

I’ve been so happy with the last few knit tops I’ve made (this and this), and I’ve been wearing them so much, that I decided to whip out another one.  This time I tried another Ellie and Mac pattern, the Discoverer Tee.

1emdiscovw__50611_900x

I had a yard of super-cute owl fabric and my usual assortment of knit scraps.  I had hoped to make the top bodice out of green or pink knit, but my scrap of white knit was the only piece large enough to work (and I had to piece the back bodice).  Then I decided the white was boring, so I made faux piping out of my precious scraps of that luscious kelly green and added that.

All great so far.

This is the point where our heroine’s hubris inevitably leads to her downfall.

I don’t even know what I was thinking, other than that I was so excited about those adorable owls, and I was finally getting some time to sew, and I’ll just cut out the 2X on the top and grade out to the 3X at the waist and hip and it will be great . . . .

I did not measure the pattern pieces, friends, and that is my hubris.  Only the gods can choose the correct size on a new pattern without having finished measurements!  I was struck down by my nemesis!

Okay, it wasn’t as dramatic as all that, but the result was clearly not what I was going for.

009

I’ve left vents open on the sides, but this is still too tight.  My usual goal is to have clothing skim over the lumps, but this right here?  This is hugging, not skimming.  And the sleeves are especially tight.

So, considering the problem is all over, I think the thing to do is unpick those side seams and add a strip of fabric all the way from the ends of the sleeves to the hem.  I’m not sure what fabric to use for this . . . I may have enough of the green or white to use one of those.  You know how much I love me some colorblocking.  And once I figure out how to get this pattern to fit me, I’ve got another fabric combination all picked out for another version.

But this experience also got me thinking about all the clothing I have–both me-made and ready-to-wear–that ALMOST fits me well.  I have a lot of clothes that I just pass over every day when I’m choosing what to wear because they’re just a bit too short, or the neckline’s too low, or they’re a little bit too big or too small.  Now that I have some things to wear that really do fit well, are comfortable, and just feel like ME, those other clothes never get worn.  So today I went through my closet and pulled out some clothes I like that just need a little tweaking for me to love them; they went to the top of the still-massive mending pile (sigh; the struggle is real).  And a bunch of things that aren’t fixable went into a bag and will be given away to someone in my Buy Nothing group.

011 (586x640)

I think it’s time to raise my standards when it comes to clothing.

[clears throat]

From now on, I’m not settling for less than clothes that feel good, are comfortable, make me look good, and that are what I like and want to wear.  Because why am I sewing if I’m not getting high-quality, custom clothing out of it?  Seriously, I’ve got a ton of beautiful fabric here and a zillion great patterns, so why settle for less than something I will love?

Have a wonderful week, friends, and I hope that whatever you’re making brightens up your life.

STH

WIP Wednesday: All the Colors (Plus Black)

Tags

, , , , , , , , , , , ,

016 (640x480)

Tulip Town in Mt. Vernon, WA.

WIP = Work in Progress

Hello again!

Inconsistent posting continues, but I hope you’ll bear with me while I work through the stressful and busy phase I’m currently in.  Sewing has been very sporadic, but I’m hoping the next few weeks will be a little more settled and I can get back to making things, as I miss it!

In the meantime, I have a few pretty pictures to share with you, such as that beauty at the top, from the Tulip Festival up north in Washington’s Skagit Valley.  My honey and I signed up to go on a trip up there that was being organized by his workplace.  I’ve always wanted to go, but the 5-hour drive and other logistical issues had held me back, so I jumped at the chance to take a tour where all the stressful stuff was taken care of for us.

018

This is Tulip Town, up in Mt. Vernon.  They have some displays there that have to do with all the countries that tulips come from, and some stalls where you can order your bulbs or have your face painted, but the main attraction is this one big, square field with rows and rows of tulips.  You and a mass of people wander around in the mud and take pictures to post on Instagram, while employees hover and make sure you aren’t stomping the flowers.

Am I making it sound a little weird?  Because it kind of is.  Everybody takes pictures like the ones above, while the actual experience of being there is more like this:

013 (640x480)

I have a lot of conflicting feelings about Instagram (and other social media) and how they’re used to show the world one’s perfect, glossy, gorgeously curated life–and monetize it!–while filtering out all the messy, complicated bits.  Maybe I should rebel and institute a policy of only posting pictures on social media of cooking failures, messy makeup, and my kitchen with its sink full of dirty dishes . . . 😉

Despite my complaints, we did have a lovely time, and got to have a fantastic dinner of fresh, local halibut with my buddy Heidi while we were up north.

Anyway, back home, I finally did finish and hem my Memphis Top.  I’ve been wearing it most days since then, so I’m calling it a win.  It’s so comfy, and so cute, that I love wearing it, even if it might make me look a little bit pregnant.

015

Not ready for Instagram.

I wound up taking 3 inches off the hem, and I think it’s about the perfect length now, though I have found it to be a bit aerodynamic when the wind blows!  That fun, full skirt does fly around with just a little bit of wind, which we tend to have a lot of here in the spring.  Note to self:  maybe find something else to wear when we have those 25 mph days.

The other big news is the little treat I got myself the other day as a reward for being brave (that kind of makes it sound like I was wrestling bears or something, but when you have anxiety, “being brave” can look a lot like doing normal grown-up stuff).  I heard about a company called Fab Scrap recently (I think on Facebook?) that resells fabric remnants generated by the New York garment industry.  I was sorely tempted by the prospect of unique, high-quality fabrics packaged in grab bags, but the shipping costs all the way across the country made me hold off and wait for a sale.  Which finally happened a few weeks ago.

I got myself a dark yard pack–5 pieces of at least 1 yard each–and a black scrap pack.  (Yeah, I seem to be going through a black phase right now.)  Here’s the yard pack, accompanied by a nice note:

001 (640x473)

The photo shoot didn’t last long before things got a little out of hand —

004 (640x480)

But here they are:

007 (640x340)

The two on the left are ponte (or something similar), and the one in the middle is a pretty standard synthetic lining, but I think the two on the right are probably silk.  The black on the far right is particularly nice–it’s one of those sandwashed silks that were popular during the early ’90s, and it has a beautiful drape and weight to it.

And here’s the scrap pack, which is comprised of mostly knits:

008 (640x433)

I got the scrap pack because I saw this video a while ago, and it’s been at the back of my mind ever since.

The tops I love in this video are the monochromatic ones–the white one that she’s wearing, and the gray one he hangs up–and I’m a little bit obsessed with the idea of combining different fabrics with the same colors but different textures.  So I’ve now got the scrap pack and a few other remnants I’ve picked up, and I’m going to have to try this idea soon!

Have a wonderful week, and I hope you’re finding crafty inspiration all around you.

STH


WIP Wednesday: Spring Silliness

Tags

, , , ,

005 (640x561)

WIP = Work in Progress

Happy Wednesday!

I know what you were thinking–poor old STH disappeared into a pile of mending and was never heard from again!  Well, it’s not quite that bad, but I just haven’t been sewing much, as I’ve been busy with other things.

I did make a start on the mending, but, predictably, got lured away by a fun spring-y knit fabric calling to me from the knit bin (that’s what I get for organizing my knits).  As I’ve written about before, my generally careful and cautious self tends to make not-very-sensible sewing decisions in the springtime, so it was probably inevitable that the bees-and-flowers top would happen.

And this is the pattern I chose.


Potential cons associated with this project:

1.  I’ve never used a pattern from this company before, and I can’t find a single review of this pattern anywhere.  There are no finished measurements on the pattern, so sizing is going to be an issue.

2.  The pattern calls for a drapey knit with 50% stretch; what I have is a not-drapey cotton/poly jersey with about 25% stretch (I got it at a $2/lb. fabric sale at SCRAP).

3.  The last time I wore a “babydoll” style top was when I was 16, and the cashier at Safeway asked me when I was due.  In a lifetime of social awkwardness, this was definitely an awkward peak moment.


Pros of this project:

1.  The fabric has bees on it.

2.  It isn’t black, and I’ve been wearing mostly black for the past month.

3.  The pattern is more or less completely different from what I usually make or wear.

4.  I want to make it.


So, yeah, inevitable.

My measurements put me at a size 2X, but I was worried about having enough ease in the fitted top, so I measured the pattern pieces.  I decided to cut a 3X for the top part, a 2X for the ruffled bottom.  I partially sewed the top section, tried it on, and decided to lower the neckline about 1/2″; once I was happy with the top part, I cut the lining to match.

003

Glamorous sewing room selfie.

My initial reaction was “bleh,” but now I’m not sure.

Here’s a version with about 4″ of hem pinned up.

002

I think I’m going to like it!

This version may be a little bit short; I think I’ll try it with 3″ pinned up and see how it goes.  I need to find that magic length that’s “flowy” without looking like hand-me-downs from a taller person.  I was considering ripping out the gathering in the front and replacing it with tucks, but the look of the gathering is kind of growing on me.  This jersey is very thin, so the gathers aren’t too bulky, and hopefully don’t make me look like I’m expecting.  And it feels lovely to wear!

I’ll get this finished soon, then I really need to get back to the mending pile.  I started with 16 items to fix (SOB), and I’ve still got 10 to go.  One item, a purchased fleece jacket with a troublesome zipper, went into the Goodwill box, as I didn’t think I could rip out that zipper without destroying the fabric.  Another one, a pair of knit wool gloves, had a big hole where the thumb meets the hand, and there was no way a darning job would hold for long at that stress point.

Here’s one I did finish, though.

001 (480x640)

I’ve had this jacket for years, and wanted to replace the buttons for the longest time.  I recently got some new buttons (sale at Joann’s), and put them on.

New buttons on the top, old on the bottom.

003 (480x640)

I’m not in love with these new buttons, but at least they’re interesting, and reduce the “Montana cattle rancher” vibe of the jacket.  I may have only managed to get to “funky Montana cattle rancher,” but that’s an improvement, anyway.

You know, I was feeling like I hadn’t had any sewing success in the past few weeks, but I guess maybe I have!

I hope you’re having some successes with whatever it is you’re trying to do.  Have a wonderful week, everybody!

STH


WIP Wednesday: Priorities

Tags

, , , , ,

007 (640x480)

First priority:  CUDDLES.

WIP = Work in Progress

Happy Wednesday!

I am a little tired and low on words tonight, but I do have a few pretty pictures for you, so let’s take a look.

I finally finished up the mini quilt for my sister’s birthday, only a little bit late.  I don’t know why I sometimes lose steam in the middle of projects, but I sure did on this one, so it took longer than it should have.

This is about 13″ square.  Frankie is a bit smaller than he should be, simply because I had to print the pattern at 95% size to get it all on regular printer paper.  Other than that, this project went pretty smoothly.  I used Steam-a-Seam 2 again on this, and I think I may be moving along the learning curve on it–gets easier every time I use it.

004 (640x508)

I hand sewed the smallest pieces on there–just easier than trying to get the machine to navigate those little curves, though buttonhole stitch worked through three or four layers of fabric and fusible can also be hard work.  Rain was in the forecast when I did it, and my hands were not very happy about those layers.

003 (640x545)

I didn’t really plan on such dense quilting–it just sort of happened.  I did the outline and added a few swirls, but then it looked strange to have the area outside of that be unquilted, so I had to fill it in.

An important note on doing spiral quilting (which I definitely need to remember for next time):  for reasons that aren’t very clear to me, spiralling counter-clockwise, as I’ve done here, is significantly more difficult than going clockwise!  It’s harder to see what you’re doing when you’re going counter-clockwise, but I don’t think the difference is down to just that.  I can’t really explain it, but it just seems much easier, and looks much better, when done clockwise.

005 (640x633)

This past week I also did some work cleaning up and organizing my knit stash with the help of some new-to-me plastic drawers from Goodwill.  I also donated a plastic tote full of bags I sewed years ago for a craft show.  It made me a little sad to see them go–they represent a dream that I had that fell by the wayside–but it also felt like a step forward.  I’m trying very hard to work toward new dreams, and it’s time to let some old ones go.

I’m liking my new spacious sewing room, but I’ve run into a pretty big obstacle:

008 (439x640)

Yes, it’s the Mending Pile of Doom.  Or maybe Return of the Mending Pile of Doom?

Anyway, it actually toppled over the other day, so maybe that’s a sign that I should deal with it.  There’s some darning in there, another pair of pants that needs pockets, and a couple of the dreaded zipper replacements in ready-to-wear garments, everybody’s favorite mending job.

So this coming week should probably be designated as Mending Week, and I should probably try to be a responsible adult who tackles difficult challenges head-on and forgoes immediate gratification.

Well, I’ll take a stab at it, but no promises.  If I get halfway through the pile and decide to take a mental health break and sew something fun, I’m totally gonna call Mending Week a success.  It’s spring and I’ve got that fun knit with the bees and flowers on it, so don’t count on me being a responsible adult for too long.

Here’s another picture of my bestest buddy, just because.

004 (640x480)

Have a great week, and I hope you’re not being so responsible that you don’t have time for a little spring fun.

STH